Tag Archives: sewing

I’m going to pretend it’s still May.

That way I can still claim to be posting at least once a month.

I thought I should probably post photos of BratzBasher’s completed kimono (Simplicity pattern 4080). It was an absolute bear, I tell you. Right to the bitter end. When I’d finally sewn the last stitch, I told BB, “I’m never making another one of these unless someone offers me hundreds of dollars and at least a pound of gourmet chocolate. Here is the finished result (please ignore background clutter):

kimono front


kimono back

Not too shabby, if I do say so myself. BB’s bangs are that long because she’d been growing them out for months in anticipation of attending the first day of AnimeCon as Undertaker from Black Butler. Here’s a photo of that costume. I’m really only responsible for the coat, but I consider it to be a feat of refashioning awesomeness.

Undertaker

When BB told me she wanted to dress up as Undertaker last Halloween, I balked at the task of finding anything remotely resembling that coat with the overlong sleeves. I certainly had no intention of creating one from scratch. Luckily, Goodwill came to the rescue. I don’t have any before pics, but the coat was cobbled together from a blazer, a long skirt, a pair of slacks (Yes, those sleeves are actually pant legs!), a zipper, and some velcro. I am a genius. The sash is a twin size flat sheet — no cutting or sewing necessary, though I did snip off the tag.


More Upcycled Jackets — and a dress

As promised, here are three more projects that I completed for the fundraiser’s silent auction. I don’t know what people wound up paying for them because I wasn’t paying attention to the auction sheets at the end, but I doubt any of them went for less than it cost to make. In the end, I had three jackets and a baby dress. (See previous post for jacket #1, which turned out to be my favorite.) As usual, you can click on any image to enlarge it.

Floral Patch Jacket:

Floral Heart jacket

The graphic was originally off-white with a navy blue outline of the flowers, but I colored it in with fabric markers. The colors were pretty saturated at first, but I ran it through the wash to get this cool watercolor effect before the ink fully set. Yeah, I totally did that on purpose. Can’t you tell? Trust me — it looks way better now.

Frozen Jacket:

Frozen jacket

I found the t-shirt I used for the patch at one of our local Goodwill stores. There were about a dozen of the same shirt, and all of them had the same manufacturing defect: patchy lettering. The letters were originally a thick, sparkly turquoise. I embroidered over them with a satin stitch, and they look better than the original would have, I think. I also embroidered a large snowflake at the top of each sleeve. I’d purchased some snowflake iron-on patches from Hobby Lobby, but I decided that they didn’t really work after all. I think this jacket turned out great. There were a couple of moms in a bidding war over it — don’t know how heated. I heard the winner’s little girl wore it almost the entire next day. That made me happy.

Fairy Dress:

Fairy Wings dress

I found this dress at Hobby Lobby. On the front, I embroidered a pixie dust border graphic I found on the internet. On the back, I used the same colors to embroider wings. The outline of the wings and the stars from the pixie dust are in glow-in-the-dark thread. This dress was the most time consuming of all the projects, but it turned out pretty great. I used the top of a onesie to line the dress so the threads wouldn’t irritate the wearer’s skin. Sorry I didn’t get any pics of this one in the dark.

So those are my most recent, completed projects. Now I’m back to working on BratzBasher’s kimono. I’m using Simplicity 4080 for the pattern and some gorgeous brocade in a dragonfly pattern I found at JoAnn a couple of years ago. I’ll post pics when I’m done.


Upcycling, which is way better than chucking(…or “up”chucking)

I’m starting to think it might be a realistic goal to post once a month. We’ll see.

I wanted to show you a bit of what I’ve been up to lately. I have two major projects on my front burner: BratzBasher’s deluxe kimono and a new cover for my dad’s patio swing. Both of these have been temporarily put on the back burner so I can whip up a few things for the silent auction our church ward is having to raise money for youth camps this summer. It’ll be going on in the background during Trivia Night this Friday.

Merkin is in charge of the kitchens Friday night, and he has appointed BB as kitchen manager, or something. He is, of course, “executive chef”. He’s actually got everything organized like a real restaurant so that the kids on his staff can gain real job experience. He’s offering professional referrals to anyone who does a good job. But I’m not involved in the kitchen stuff, so I’m not going to elaborate on any more of that. Instead, I will show you one of the five projects I’m donating to the auction. It was inspired by BratzBasher’s Killer Rabbit jacket, and it’s already my favorite item. I hope other people like it as much as I do — like enough to pay good money for it and help send kids to camp.

I started with a basic denim jacket from Baby Gap (size 2T/3T), a graphic t-shirt, and a really cool iron-on applique from Hobby Lobby. Sorry, no pictures of the process, but you don’t need photos for this project because it’s super simple. Here’s my technique:

  1. Cut the front graphic from the t-shirt (I basically just removed the front of the shirt from the rest, so I still had plenty of margin to work with) and apply fusible interfacing to the back of the entire piece for stability.
  2. Trim the image to the size you want. It’s easiest to work with just a basic rectangle, so I used a rotary cutter and straight edge.
  3. Position patch on back of jacket and pin in place. I like to pin all over, not just around the edges, so that the piece really stays put during the next step, which is…
  4. Sew patch to jacket with a straight stitch all the way around the edge, leaving a margin of about 1/4″. When you get all the way around the four edges, keep going maybe an inch past the first stitch and then backstitch to lock everything in place. You can use matching or contrasting thread. I prefer to use contrasting because I like the “obviously customized by a cool person” look. Be mindful of the tag inside the jacket during this step. You don’t want to wind up sewing your care instructions face down onto the fabric. Depending on where your stitching and tag are, you may need to pin your tag up or down out of the way. In my case, I had to pin it down.
  5. Remove pins (except for the one keeping your tag in the desired position) and sew all the way around the edge of the patch again, using a zig-zag stitch. I set my stitch width to 4 and the length to 1. Again, I didn’t want it to look too professional. Center the zig-zag stitching between the previous straight stitch and the raw edge of the patch. Backstitch at the end, same as in the last step. Because the backstitching is more obvious on the zig-zag, you will probably want to start/finish in a lower corner. (In the photos below, you can kind of see where the stitching is darker/denser in the lower left corner.)
  6. Extras: I added the awesome “ROCK” applique I got from Hobby Lobby. I had originally thought it would go on the front, but the jacket had pockets on the chest with big snap closures. BB suggested I put it on the upper arm instead, and I think that’s much better. It’s an iron-on, but I never trust those — especially ones with odd shapes that could peel up around the edges, so I hand stitched it in place after ironing it on.

Here are photos of the finished product. I had a terrible time getting the flash working right, so the only one that’s true to color is the close-up of the ROCK applique. The lightning bolts on the patch are neon green, and the patch is hot pink with black, purple, pink, and blue print. Click on an image to see it full size.

girl's rocker jacket

left sleeve

Rock!


Girls Rock patch

Jacket: $3 (Goodwill); T-shirt: $2 (Goodwill); Applique: $1.99+ $0.16 tax (Hobby Lobby); Black Thread and Fusible Interfacing from my stash: FREE!

Total Cost: $7.15

Having the most rockin’ jacket on the playground: Priceless

It’s a shame I didn’t stick something like a dollar bill next to the jacket for size comparison. It’s even cuter when you realize how small it is. Maybe I’ll have to take another pic and update this post. So what do you think? I don’t think it took me an hour from start to finish. Stitching the applique on was the most time-consuming part, and that was because it was so intricate. I’ll post pics of the other projects when they’re completed. There’s even a little  dress with glow-in-the-dark embroidery. You’ll love it.


Finished Costumes

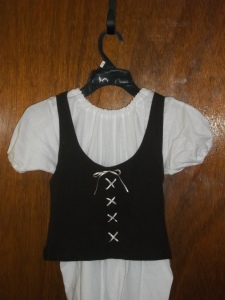
I’m finally finished with my share of the costumes for Beauty and the Beast. Here are some pics:

Shirt and Bodice

100_0251The white shirt is just a tee that I found at Goodwill for 34¢.  I put elastic in the sleeve hems, cut a new neckline, and added elastic to that, too. The bodice is a basic, ribbed tank top ($1.50 at Goodwill).  I used 1/8 inch ribbon to sew fake laces on the front, and I shortened the length to just 8 inches or so from the neckline (using a zig-zag stitch).

The Enchantress’ Dress

100_0252I found a dark green dress at Goodwill for just $2.00 and cut a slit up the front.  Then I found a bright, neon green, sheer fabric with glittery swirls on it to make an underskirt and lengthen the sleeves.  I also added a sash.  Of course, with the underskirt being so sheer, I also made a slip to go underneath (cotton and netting).

Here’s a close-up of the glittery swirls:

100_0253You can see them better if you click on the image to enlarge it.  I think it’ll look great under the lights.

I learned quite a bit working on these costumes, and tried some new-to-me techniques.  I think the hardest part of the whole thing was cranking out multiple shirts and bodices.  It got a bit tedious.  Now I’m on the theater’s radar as a potential future volunteer.  I hear next year’s play has pirates in it.  Anybody have any good, cheap pirate costume ideas?


sewing costumes

I recently volunteered to help a friend from church come up with costumes for a local children’s theater production of Beauty and the Beast.  And, yes, it’s the Disney-fied version with dancing cutlery.  I’m mainly helping with the enchantress and the village girls.

I’ve already learned a lot — for instance, I can now make short-sleeved peasant blouses out of t-shirts, long-sleeved blouses out of men’s dress shirts (thanks to a tutorial on youtube), and lace-up bodices out of tank tops.  Who knew, right? I’ll post pics of some pieces when I have more done.

In the meantime…can’t blog…sewing.  I’ve got more than a dozen blouses and bodices to make — not to mention the aprons and the fancy dress.  And yes, I am having fun.